Ever wanted to make your Android device do more? Rooting it is the answer. This blog post will teach you how to root any Android device, no matter what carrier or country you are in. We will be using various rooting methods and its step by step instructions on how to get started. Follow along with this tutorial for a hassle free rooting experience!
Rooting an Android smartphone isn’t just a fun-generating process or performing lots of tweaks. But there are many times between our virtual life when we all feel bored and stuck on various Android functions, and at these challenging times, root access helps us gently.
As we all know that every operating system contains both, Advantages and Drawbacks, so the same things happen with Android OS. But if you’re performing the root process with your smartphone, then you can get bold access to all the fantastic tricks and tweaks.
These tweaks can make your smartphone activities magical, easy, and futuristic. Furthermore, You can also use lots of the Custom ROMs on the rooted smartphones to enjoy a fantastic OS interface that you haven’t experienced yet.
So if you’re also an aspirer, watching for the legit universal process to root your smartphone, You’re finally at the damn correct space. Today we’re offering here the universal guide below, which will help you root all your Android smartphones without any hassle.
This guide will introduce you to many processes, advantages, disadvantages, numerous root operators, and much more stuff freely. So let’s get into it ASAP!
What is Rooting Android?
As you’ve seen so many errors and limitations in lots of Android version smartphones, like Android Lollipop, Marshmallow, and Oreo, “Rooting is a convenient process to upcome those limitations.”

In technological words, Rooting is the process after which you can get the free allowance to your Android’s insider processes and programs, or you can simply attain vested control over your smartphone.
Rooting will give you all the permissions you require to change the entire developer settings inside your software, either if it’s to change the OS version, update tweaks, or install a Custom ROM.
So if you’re the one wandering for all such updates, which haven’t launched yet for your device, you can go through our below methods and can root your smartphone happily.
But before that, let’s take a wise look at the advantages and disadvantages of rooting Android Smartphones.
Why do we need to Root Android?
There are thousands of calls, which made millions of guys rooting their device. Now the root access can provide you hundreds of thousands of privileges, which are simply impossible to cover on a single page.
But still, we’ve researched our best and accumulated all the legit reasons and privileges accessible after getting root access.
Rooting Android provides you with the permission to modify your smartphone’s interior look almost entirely. Suppose that you’ve once used Oxygen OS on any OnePlus smartphone and now dreaming of it on your Lenovo device.
We all know that it’s impossible formerly! But rooting your Lenovo device will make it happily possible, and that’s the power of root access.
Well, it’s just a simple privilege or needs why lots of people root their smartphone. If you want to know more, you can go through the below advantages list and on most of the rooting operators, which are developed principally for some unique tweaks.
Advantages

- First of all, you will have access to use all your Android device aspects without any barrier.
- Rooting an Android device will help you install various Stock and Custom ROMs on the interior OS wall.
- There are many root methods and managers that can deliver you lots of unique tweaky modules for endless fun.
- You can capture better backups of your data smartly after rooting your smartphone. Additionally, many after-root apps can help you back up app data!
- You can use the incredible app modifiers and lots of excellent Android apps like Lucky Patcher with full feature support.
- Rooting allows you to modify and customizes almost the entire side of your device’s interior OS.
- You can enjoy lots of different brand UI on your Android smartphones, like MIUI, OxygenOS, and many more.
- If you’re a gamer, you can overclock your device’s processor speed and can make the beast gaming without those expensive configurations.
- After rooting your smartphone, you’ll have access to uninstall any Android app from your device anytime, either if it’s a system or third-party.
- There are many modules and useful apps to enhance your device’s battery life by shutting down some non-useful services.
Disadvantages

- The most horrible disadvantage is that your Android device can get bricked sometimes for its entire life if you’re performing the process in the wrong way.
- Rooting a smartphone will void your smartphone warranty, whether it’s a newly bought device or a six-month-old one.
- There are many complex security applications, mostly banking applications, that you can’t use after rooting your smartphone.
- After unlocking root access, You’ll break most of the security aspects of your device, which can make your device malicious and easy to hack.
- If you’re overclocking the processor for high-phase gaming, it can also overheat your processor and introduce you to troubles.
- Automatic Firmware updating console will work inside your smartphone if you’re rooting your smartphone. Well, you can elsewhere use the Custom ROMs and can download updates on your own.
- Uninstalling a most useful system app after rooting can push you into big trouble, so try tweaks carefully.
Steps to Root any Android Device?
So after ultimately acknowledging the fundamental knowledge about the rooting process, including its merits and demerits, we’re ready now to get straight towards the prerequisite steps for rooting a smartphone.
It’s not as complex as it sounds, and all you need is to perform the below listed simplistic steps –
Enable USB Debugging and OEM Unlocking
Step 1 – Open the Settings app on your Android smartphone.
Step 2 – Now locate the About Phone tab and tap it ASAP.
Step 3 – You’re now required to search for Build Number there. If it’s on the About Phone section, get to the next step, or if it’s not, get inside Software Version or Version menu.
Step 4 – Now click the Build Number 7 times, and you’ll get a pop-up that “You are now in the Developer Mode“.
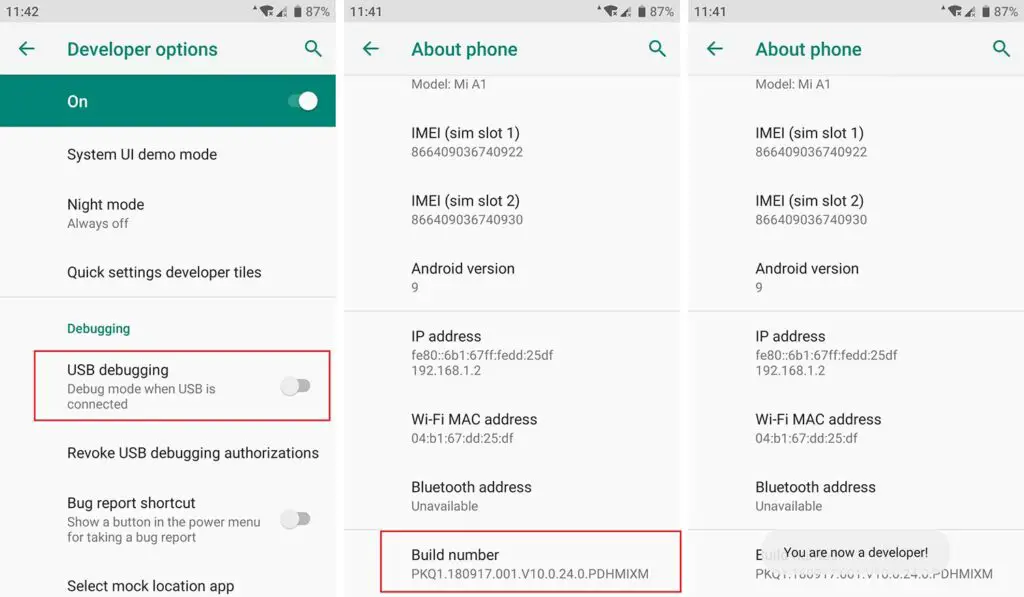
Step 5 – Go back to the main Settings menu, and open the Additional Settings. Or You’ll get the Developer Options on the main Settings menu in some of the smartphones.
Step 6 – Open Developer Options, enable OEM Unlocking and USB Debugging toggle.

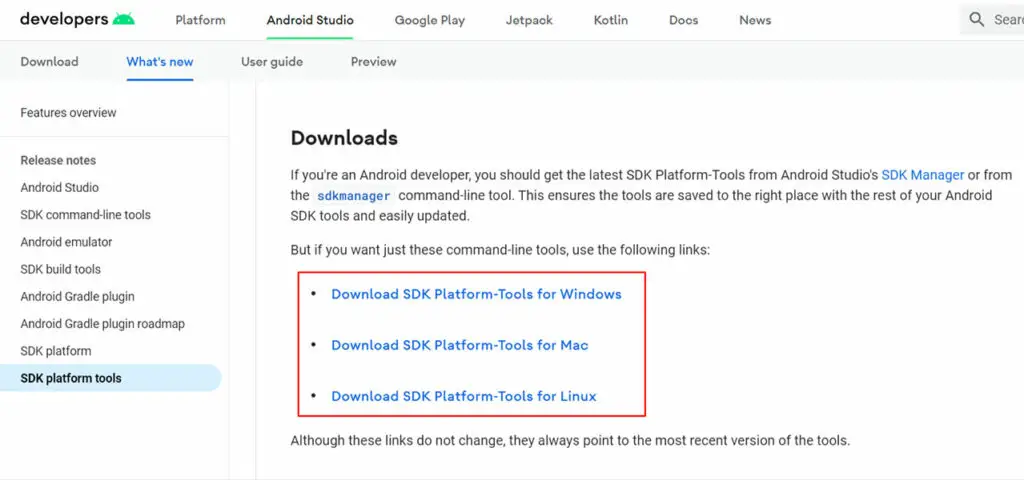
Setup Android SDK Platform Tools
You’ve finally enabled all the developer permissions on your Android smartphone, and You’re ready now to perform the process required to complete on your PC or Laptop.
Basically, the Android rooting process requires some Android tools, like installing the ditto Android version with some exceptional tweaks.
Don’t worry about that, since it’s not that complex! All You need here is to open the below link and download all the required Android SDK platform tools.
It’s the official platform for downloading all Google Android tools so that you won’t need to worry about anything. Excepting that, You’re required to download these tools correctly related to your PC OS, like macOS, Windows, and Linux.
So download carefully, and extract them all on desktop or any convenient folder where you’re storing all the stuff needed to root your smartphone.
Install Compatible drivers
We all know that our Computers works based on software and drivers. So, in simple words, You’re required to download the drivers of the device you’re installing inside it, or unless your PC won’t detect it.
Similarly, in the case of rooting a smartphone, You’re required to download and install the compatible drivers as per your smartphone’s brand; otherwise, your PC will detect your smartphone as a storage device.
It all matters on what brand you’re using, and so will be the driver.
No matter which phone you’re using, the only thing matters is the brand, and that’s why we’ve inscribed web links for all the brand official driver downloading websites.
You can download the driver compatible with your Android device from the below list and install it conveniently on your PC.
Unlock Bootloader on your Device
As of now, If You’ve completed all the above steps and downloaded the required compatible driver to connect your smartphone with PC, let’s get to the last prerequisite process.
It’s all about unlocking the Bootloader right now. The Bootloader is fundamentally a unique OS program or software required to start all the operations in your smartphone.
It’s loaded in your smartphone’s working memory by the manufacturers, and they lock it for security purposes.
However, many manufacturer brands lock their creation’s Bootloaders with critical locks, like Sony, HTC, Motorola, and Lenovo.
So If you’re also using one of these brands, you’re required to register for a developer account on their official website, and afterward, You can get that key happily.
Apart from these brands, there are also a few manufacturers like Huawei that won’t support you for unlocking the Bootloader.
If you’re having these brand smartphones, You’re required to download and use third-party software for unlocking Bootloader, like DC-Unlocker.
One more thing you need to know is Unlocking Bootloader clears the entire data of your smartphone, then either if it’s a photo, video, or application. So must backup all your important data before taking these below steps and unlocking Bootloader.
Step 1 – Receive an unlock key (for Non-Nexus smartphones)
As of now, you’ve successfully enabled USB Debugging and OEM Unlocking, and similarly, you’re ready to unlock your Bootloader. But in most Android Smartphones, like Motorola and HTC requires the unlock key to unlock Bootloaders.
So If you’re using these phones, you can refer to their website by the below link and apply the below steps to get that key for your Smartphone’s Bootloader.
- Shut Down your smartphone with hard pressing Power Button.
- Boot your device into Fastboot mode, by holding the Power Button and Volume-Down button together for some seconds.
- Now Connect your smartphone with a PC via USB Cable.
- Open the folder where you’ve unzipped the Android SDK Platform tools.
- Press Shift+Right Click there and tap Open with Command Prompt tab.
- Now You’ll get a cmd command on your smartphone manufacturer website to get your smartphone’s Bootloader code. Inscribe that command on CMD and press Enter.
- Now You’ll observe the Bootloader code there. Copy and Paste it on the brand website without any spaces, and then you’ll get the key for unlocking Bootloader.
Step 2 – Unlocking the Bootloader
Finally, you’ve found the key to unlock your device’s Bootloader and are ready for the next process. If your smartphone is still in the fastboot mode, you can go for the further steps below, or if not, start fastboot mode again.
You’re required to shut down your smartphone and start it by holding the Power button and the volume-down button together.
Now you’re on Fastboot mode! So connect your smartphone with a PC via a USB cable, and open the same folder of Android SDK Platform tools there. Now press Shift + Right Click, and choose “Open with Command Prompt” from the right-click menu.
If You’ve got a Nexus phone or simply the phone which won’t require the Bootloader key, inscribe the below command on your CMD prompt –
fastboot oem unlock
Either If You’ve got the Pixel smartphones, You need to enter the below commands on cmd prompt –
fastboot flashing unlock
Otherwise, If You’re having a Non-Nexus smartphone, like Motorola and HTC with a need of Bootloader key, you can follow the below commands for respective ones –
For Motorola Smartphones –
oem unlock UNIQUE_KEY
(Here the unique key will be the key you’ve got through Step 1)
For HTC Smartphones –
unlocktoken Unlock_code.bin
(Change Unlock_code.bin with the .bin file you’ve downloaded through following the Step 1)
That’s it! Finally, you’ve unlocked your smartphone’s bootloader and are ready to start the rooting process and choosing your favorite Root operator.
Still, If you’re getting any trouble while unlocking Bootloader, You can comment that query below and also can find the process for various unique smartphones on XDA Developers Forum.
Let’s get to the final process –
Root Android using Magisk
Magisk is the most used system less root method. Well, there are so many, but it’s one of the most trusted and featured root methods. It offers you thousands of features in the form of Magisk Modules and helps you customize your smartphone’s entire interior look.
Steps to Root Android with Magisk using TWRP Recovery tool-
Step 1 – Download the most current version of Magisk Installer ZIP with the below link on your PC.
Step 2 – Now connect your smartphone with the PC using the USB cable, and turn on FTP mode.
Step 3 – Find the already downloaded Magisk Installer ZIP on your PC and copy it into the Internal Storage or SD card of your smartphone.
Step 4 – Now Reboot your smartphone into TWRP recovery mode by hard pressing the power-button and Volume-Down button, or any alternative method you know.
Step 5 – If You’re unable to go for Step 4, You can alternatively enter the below command on your PC’s cmd prompt while being connected with the device having enabled USB Debugging-
adb reboot recovery
Step 6 – Click the Install button on TWRP mode.
Step 7 – Locate the specific position where you’ve copied the Magisk Installer ZIP file on your smartphone.
Step 8 – Tap the Magisk Installer ZIP file.
Step 9 – Finally, You’re required now to swipe the below-most button saying Swipe to confirm Flash.
Step 10 – Now wait for a few minutes till the completion of the flashing process and reboot and tap the Reboot System tab ASAP!
You’re all done now and can use the Magisk App (or Magisk Manager) with all its futuristic modules happily. Just open the Magisk App app, and start tweaking!
Various Other Rooting Methods
Fortunately, there are so many rooting methods developed for Android smartphones, which offer you more unique features than Magisk App.
Well, the Magisk App will be our first recommendation, but you can also find tremendous futuristic privileges inside the below-listed methods. So choose your desired process and experience the exceptional tweaks –
Rooting with One Click Root
One Click Root is one of the newest smart rooting methods developed for Android smartphones. They work on the most brilliant ethics, after which they’re able to help you root your Android smartphone with just a single click.
Yeah, you heard right! One Click Root method is developed only to simplify all your complexities while rooting the smartphone.
But still, You’re needed to follow all the before-root precautions here, while following the below steps to root smartphone –
Step 1 – Install the Root Availablity tool to check your device’s compatibility.
Step 2 – Now Open the browser on PC and download the One Click Root app for your Desktop, either Windows or macOS.
Step 3 – Connect your PC with your smartphone via USB cable.
Step 4 – Enable USB Debugging from Developer Options via the above prerequisite process.
Step 5 – Install the One Click Root app on your Desktop and run it.
Now You just need to click once on the Root button, and afterward, your PC will take care of your smartphone!
Using Kingo Android Root
It’s almost impossible that an Android Rooter never has heard about Kingo Android Root since it’s one of the oldest rooting methods. It’s a software intended program used to root the Android smartphones in simplistic ways.
You can download it for any convenient device, PC, or even on your smartphone. Just open the official website with this link to check the compatibility of the Kingo Root app with your smartphone.
Now You can download and install Kingo Root on your PC or Smartphone with the below links –
After downloading these files, you’re required to follow the below steps to start rooting –
Steps to Root Android using Kingo Root App –
Step 1 – Download and Install the Kingo Root app from the above link.
Step 2 – Now Open the app right now.
Step 3 – Now You’ll get there the One Click Root button if your device is compatible with KingoRoot. Tap that button!
Step 4 – Wait for the process, and later the app will show you a large checkmark after a successful rooting process.
Steps to Root Android using Kingo Root PC –
Step 1 – First of all, Download and Install the Kingo Root app on your PC.
Step 2 – Enable the USB Debugging on your smartphone and connect it with the PC using a USB Cable.
Step 3 – Launch the Kingo Root app on PC.
Step 4 – If Your device will be compatible with Kingo Root, You’ll get there an option to One Click Root. Tap it and be patient for a few minutes.
Root Android using Root Master
If you’re a beginner inside the rooting universe, everyone will recommend you to start with the Root Master. It’s basically the most convenient process to root Android smartphones.
Well, you won’t get that many privileges after using Root Master, but still, it’ll worth your steps. So follow the below steps to go on with Root Master –
Step 1 – Download the Root Master APK file from here.
Step 2 – Open the Settings app, and get to the Security Settings.
Step 3 – Now enable the toggle saying Unknown Sources or Third Party Installation.
Step 4 – Install the Root Master APK from the downloaded location.
Step 5 – Open the Root Master app and hit the Start Button.
Step 6 – Afterward, you can observe if your device is compatible with Root Master or not. If it’s compatible, get to Step 7, or otherwise use any of the above methods.
Step 7 – Now you’re ready to root your smartphone. Click the Start button, and wait for the rooting process. It would be best if you won’t use your smartphone in-between the rooting process.
Ultimately, you’ll get the Success message here, which will assure you of the completion of the process. Now you can download any of your favorite root managers like Magisk and start tweaking.
FAQ
Is it safe to root an Android phone?
This question is basically impossible to be answered since rooting can be safe and harmful at the same time. The only stuff that matters is the compatibility of your smartphone with the Root method, and your process efficiency. It would be safer if you’ll use the entire process correctly with compatible smartphones.
Why should I root my phone?
Rooting a smartphone is damn beneficial, and there are thousands of futuristic privileges which you can enjoy with it. Suppose that you love the OnePlus smartphone kinda firmware, and unable to use it at the Lenovo smartphone. So Rooting can help you in installing the same firmware without any hassle. Well, there are numerous benefits which you can get in the bove advantages section in this rooting guide.
What does Android rooting do?
Rooting a smartphone means obtaining 100% access to your smartphone’s systems. You can get privileged access to most of the developer and manufacturer systems on your smartphone and tweak with them using Root Access. It provides us the ability to alter or modify most of the systems and programs inside our device.
Can I Unroot my phone after rooting?
Yeah, you can simply Unroot your smartphone after rooting, only if you’re using a legit Root method, like Magisk and Kingo Root. However, You won’t get the voided warranty of your smartphone back while unrooting it.
Which root is best for Android?
It’ll 100% depend on which privilege you’re looking for. Well, we’ll recommend you to use the Magisk root, since it contains hundreds of featured modules to help you customizing and tweaking your smartphone. Excepting that, you can also use one of the best methods we’ve listed above.